Royal Enfield Interceptor - Knowledge Base
Carburettors
Index
Air Filters
K&N Air Filters
Jets
Carburettor
Synchronisation
Vacuum gauges
Amal concentric float levels
Converting Amal Concentric the Interceptor
Air Filters
Adding air filters to the Interceptor is not an easy task because
the carbs are so close together. I'd planned on making one for my
Series 1A this winter by making new back plates for the Amal-pattern
pancake filters, but so far time has eluded me. On my current Inter,
I've preserved the stock appearance by fitting velocity stacks that
have a fine brass mesh over the open end. 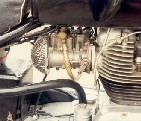 Another option is to fit a different carb, for which there are better
filters available. About 27 years ago I built a Series II, to which
I fitted a twin choke Weber 42DCOE carb. Fit in like a charm, complete
with its pancake filter. I ran into that bike again about 4 years
ago, which is still intact (actually the conversion would have been
hard to undo, because I had to alter the head castings radically).
If anyone is interested, the new owner sent me a photo
of the bike in its current state, which shows the carb pretty
clearly.
Another option is to fit a different carb, for which there are better
filters available. About 27 years ago I built a Series II, to which
I fitted a twin choke Weber 42DCOE carb. Fit in like a charm, complete
with its pancake filter. I ran into that bike again about 4 years
ago, which is still intact (actually the conversion would have been
hard to undo, because I had to alter the head castings radically).
If anyone is interested, the new owner sent me a photo
of the bike in its current state, which shows the carb pretty
clearly. "gREgg" I have my first question for the group. Since the 69 came without air filters, what type of air filter do people generally use now? I'd like something with a Brit look to it if possible, rather than something like a modern K&N. Secondly, adding the air filters will presumably richen the mixture by restricting air flow a bit. What sorts of jetting and setting changes have people found are needed, if any, to pilot jet, throttle valve cutaway, needle jet, needle setting and main jet? Did the factory ever publish any guidelines in this respect? Thanks. "Bob Cram" Dont know why, but I always thought that maybe the Commando air cleaner might be a close fit Also, there is a Series11 on the OVM website with a chrome Brit derived aircleaner attatched, maybe they could give you some info on its origin, they're at http://www.oregonvintage.org/ always wondered what it actually was... Good hunting "Bob" Hello Bob, A general comment on the air filter for the series 2. I had one of these R.E. items which was the replacement for the bell mouths. It had a 2 piece fibreglass body which contained a large paper air filter element from a Ford Transit ( Transit was (is) a very popular cargo van in Britain ). I always meant to install it on the bike but to tell you the truth, it was so bloody ugly that I stayed with fashion over practicality and kept the bell mouths. Regards, "Roger" |
K&N Air Filters
|
Air Filters again I have just re-read the section on Air Filters on Royal's site. I have also just returned from the garage after putting a vernier on the carbs while having a look at the K&N catalog. What I do not understand is why I can't just pop on a pair of K&N's. From the web site postings I gather the difficulty is the carbs being close together. Other reasons this might not work: If someone has tried this and it doesn't work please tell me now so won't waste anymore time. If not here is my result so far: The Amal inlet side is 45.5 mm. The velocity stack is 45mm long and 65mm wide at the inlet side. 24mm clearance between the widest part of the stacks. So the center distance should be just under 90mm. the K&N cat. shows RC-0890. I think these will fit. So why not use them? There should be over 10mm clearance between the filters. I think I will make a cardboard cut out and see if there is space for them. Good Cheer K&N Filter. Rick, my RE2, which is still in
restoration, came with K&Ns on it that fit fine. The only reason
I was interested in something different was in order to have a more
authentic British period look, such as the pancake filters so common
on many Brit bikes of the era. If you aren't interested in that,
then K&Ns should be fine. Thanks for saving me some work and time finding a suitible K&N filter, I am also looking for an air filter replacement. What Interceptor and carb do you have? Just to make sure that the CR-0890 might work. I will make some verifying measurements at my carb. I would prefer to find an oval pancake type or what K&N call "Dual Flange Oval" air filter this would be more more look alike to the original one. Anders RE Interceptor mkII, -70 with Amal Concentric 930/32-33 Anders, I have a 1967 Mk1a. Carbs, Amal 930 stamped 88 and 89. I've no idea what the 88/89 and 32/33 means. I just checked with two cardboard templates of the 3 inch x 3 inch (76mm = 3 inches) "Round Straight" RC-0890 filters. There is enough room for an index finger between them. My breather hose will need to be moved slightly so it will not lay against the filters. These will fit, but will they work? K&N do NOT make filters with a 46mm flange ID in the "Oval" or "Dual Flange Oval". These come in 44mm, I do not think that will fit on the 930 Amals. I came into possession of a Nort*n Commando with a dual flange filter on it. I might be able to find it and see if it is a 44mm. It sure was hard to get on and off. Anyone know if the 44mm is the better fit on the 45.5mm threaded stub on the amals? I have some old K&N's with a larger ID flange. These are loose in the threaded stub, but the velocity stack fits more snug in these filters. I guess I could cut off the velocity stacks and use them as spacers and fit these. Putting a Vernier on them gives me varying measurements but I think these are RC-1820, 51mm Flange ID, a 3 x 4 oval and 2 3/4 long. It is not so straight forward, but it looks like there are several options of K&N's that will fit. Even if run with no oil, they at least keep the rocks and small birds out of the intake. What to do?
Rick, my RE2, which is still in restoration, came with K&Ns on it
that fit fine. I can check tonight to see if they have a number
or other identification on them. The only reason I was interested
in something different was in order to have a more authentic British
period look, such as the pancake filters so common on many Brit
bikes of the era. If Bob Cram |
Jets
|
To me, the most important thing to get right before worrying about any jetting changes is to get your slides sleeved so that they fit well. Then, replace your slide needles and the corresponding needle jets.
This is not as straightforward as it should be, as I've reported in the past. Reason is that new jets are not controlled to the precision they should be ... I measured a couple dozen a few years ago, and found that they often overlapped the jet sizes above and below the marked size. For this reason, I recommend buying the sets of matched needles and jets now marketed by Amal ... think about it: they are offering them for a reason ... The other thing to watch is there are two styles of needle jets: one that's cross drilled and one that's not. Also, be aware that each requires its own needle, and jet holder. Finally, there are several machining operations in the Amal carb, that unless they have been done accurately, can lead to carburetion errors. The easiest to measure is the height of the needle jet holder. Often the boss in the carb body is not accurate relative to the datum, and the other is the finished height of the hex of the needle jet holder itself. I've measured significant discrepancies in these parts. Final recommendation is for something many people have a hard time with: synching your carbs. For years I did it the die-hard way. Not anymore: about 8 years ago I bought vacuum gauges (which were a necessity for my J*p*nese muscle bikes), and thereafter started using them on my British twins. What an improvement .. for good reasons .... using the gauges ensures the carbs track all the way up the scale, as well as when you close the throttle. The performance improvement is very worthwhile. Of course, this brings us to ignition topics, but lets leave that for another day. "gREgg" |
Carburettor Synchronisation
| Hi I am not used to bikes with two carbs. I have just had thumpers. So I wonder: 1. What is it you syncronise? 2. How do I syncronise the carbs with vacum meters? 3. Are there connections at the carbs for to connect the vacum meter. Sorry for these basic questions, but I have only had my Inter for 5 months! I will supply you with more silly questions in the future;-) Best regards Anders ----------------------- I've never used vacuum gauges, so can't help you there. If you have Pete has been archiving discussions from the Brit-Iron listserv on http://www.captain.norton.clara.net/index.html#index start It's useful to bookmark the site, because you can find lots of things I have included the content of the synchronisation below: >When balancing the carbs, and setting the cables so they pull together,
try putting The only problem with the above procedure is that it although it may assure simultaneous slide movement, it doesn't address the relative positions of the slides. One cable can be adjusted longer or shorter but compensated for by the idle adjust screw. Mine was. I'd like to suggest an easy way to adjust the slides: Remove the air filter. You'll need a few inches of solid core insulated copper wire. About the length and guage of a Q-Tip shaft. I've used toothpicks in a pinch. Anything,as long as it's rigid and about that diameter. Cut 2 pieces about 3 to 4 inches long. Place one end of each wire into the carb mouth, and rest the ends under the lips on the slides. The centers of the wires should now be resting on the flat edge of the carb opening, with about 2 inches extending out of the carb. The idea is that if one wire is resting at a different angle, the slides are at a different height(out of synch). This is much more accurate than eyeballing them. Make sure the slide stop screws used for idle adjustment are fully backed off, ie not touching the slides. Adjust the cables on top of the carbs until the angle is the same. Slowly turn the throttle control a bit. Both wires should start moving at exactly the same moment. If not, re-adjust cables until desired effect is obtained. Now turn the idle screws previously backed-off until they both just touch the slides. You'll know this because the wire will start moving at that point. After doing both carbs, give 'em about 1 1/2 turns each. This will be close to where it should be. Since both carbs are now in synch, do any idle adjusting equally to each carb.
The whole routine is more work, but will result in a smoother running engine.
So much for Amal Synchronisation as per Norton suggestion, now let's see what
Gregg says.... Let's see if we can build some momentum with this topic... I used to have one of those Carb Stix devices as well, and as you say, it is quite easy to suck the mercury into the engine. No harm done of course. However, the inability to rev the engine prevents you from doing the most important test: checking throttle synch from 1/4 to 3/4 open. A pair of commercial mechanical vacuum gauges allows this test nicely, and they are very easy to use. You are correct that very small needle valves are absolutely required to damp the needle flutter on the gauge while the engine is running. Aside from buying a commercial gauge setup, one can easily build one, like I did for a Norton friend a couple of years ago. We bought a couple of imported vacuum gauges from an industrial supply store, as well as some brass needle valves from an aquarium store. The rest is left as an exercise for the reader ... Vacuum ports are easy on any bike like a Commando or an Interceptor with a balance tube on the inlet tracts ... just remove the balance tube, and connect your gauges. In fact, you *need* to disable the balance tube, because it will mess up your balance reading, since it tends to (no surprise here) 'balance' the vacuum side to side at low engine speeds. For an Interceptor, connection is very simple via the balance tube ports. You'll need to find bolts that screw into the banjo bolt holes in the inlet tracts. Drill out the bolts, and solder in some small dia brass tubing to take the hoses that feed your vacuum gauges. When you're done synchronizing, just re-fit the balance tube. The other device you described is called a 'UniSyn', which was the gauge of choice for the SU carb crowd in the 50's and 60's. Major disadvantage is that you can only measure one carb at a time. Also, it is not very sensitive, and to get any reading at all requires adjusting it to choke off a large part of the carb's air flow, making it rather intrusive to the engine's running ... it takes much back and forth to get balance. I'd read about UniSyns for years, and finally bought one about 20 years ago to tune the twin Webers of my Lotus Elan. Let me assure you I used the UniSyn only once before seeing it for the clap trap that it was ... BTW, there is a device similar to a UniSyn made in Germany, which has a much more sensitive meter scale, and though I've never used one, it may be a good bet. However, for me, the mechanical vacuum gauge is the only way to go from a cost and performance point of view. .. "gREgg" The old trick of using a small dia hose can work well with carbs like SU's that make a distinct hiss. However, on Webers, there is virtually no hiss from the main venturis during idle. This is not ment as an insult i have used a length of hose and listned to each carb for sound not at all scientific, it is fairly close, but i agree that using a SU balancer is not the best, although i have seen an earlier version that looks much better. some people use the method of unhooking one spark plug when checking the mixture that seems o be most common do you feel that is the best method? another topic how many in this group have triples, i have an X75 and a 69 A75 and a 68 cooper S and 71 europa. "Clive" --- In RE_Interceptor@y..., "G.R. Kricorissian" <gregg-k@s...> wrote: > On my current Inter, I've preserved the stock > appearance by fitting velocity stacks that have a fine brass mesh over the > open end. Thanks Gregg. Living where I do in the Canadian prairies, which get quite windy and dusty in the summer, I don't think this would work for me. Or would it, at least with frequent oil changes? Nothing worse than a dusty environment for velocity stacks, and the brass screens would not stop much. Oil changes wont help much either, since the damage is directly to the bores and pistons. I found out the hard way about 30 years ago with my pride & joy Triumph GT6 which I modded to race specs including triple Weber 40DCOE carbs (and open stacks). I had to rebuild 2 years and 20K miles later ! > To me, the most important thing to get right before worrying about any > jetting changes is to get your slides sleeved so that they fit well. Agreed. Once I get that right, I take it then I just play around initially with needle position by doing some plug readings, and then make decisions from there whether I have to worry about different needle jets, etc. Would that be the best route? Yes, that's right. However, I think you'll find the stock settings will work well as long as your carb slides are OK, and your timing is accurate. On a non-RE topic, but related to your comments about improperly manufactured needle jets, I've had trouble with rich running on my Bonneville. I'll have to check out the size of those needle jets and whether they are in fact correct and .106 like they are supposed to be. New needle jets did not help, but that may just have been lousy quality control in the manufacturing process. "Bob C" Yes, check the bore of the needle jets with a precision pin gauge. Good ones will measure spot on 0.1060. Most defective ones will be oversize by a thou., but I've seen them a thou under, too.. I went through quite a few to find the ones I put in my Series 1A. However, be just as cautious with your needle jet holders too ... the variability is just as bad. ... "gREgg" Vacuum gauges For any of you who are still synching their carbs the old time-
honored way, all I can say is stop now, and get with the times.
The vacuum gauges make it easy to get the carbs synched all the
way from idle to WOT, and what a difference that makes in throttle
response. Of course, once synching is done, you re-install the balance
tube. My vacuum gauges are a bank of 4 dial-type instruments I bought at a motorcycle shop years ago, and are made specifically for synching carbs. I built a set for a friend with some small vacuum gauges I bought from a surplus automotive shop b... they worked well too. You can differentiate them from pressure gauges because they read backward from right to left. The only thing you have to include (no matter what you do) is a needle valve in series with teh gauge, otherwise you the instrument's reading will oscillate wildly. You can get suitable needle valves from an aquarium supply store (they're used in aquarium aeration systems). .. gREgg Amal concentric float levels Is there someone out there knowing about amal concentric float levels? I have a lot of those nylon floats and pins and (not to my surprise) they all give different levels. Probably bent by old age.. But what should the correct petrol level be for an Interceptor? I once tried one of those bronze / Viton pins. Got the impression that they lower the level some mm. (I suppose by not floating on the petrol like the nylon ones.. and the play in the connection to the float-arm. Paulus Most of my knowledge of this comes from Triumphs, which use the same carburettor. Gregg might know if the RE setting is supposed to be different. With a Triumph, you want the float to rise to 1/16" below the top of the float bowl, so that's probably at least a good approximation for the RE. You can check how far it rises by holding the float bowl with pin, float, etc. all in place. Include the gasket, because the pin rises up to the point at which the gasket holds it down when the float fills with fuel. With your thumbs firmly on top of the gasket where the pins meet it, turn the float bowl upside down and see how far the float falls. You may want to have a second person handy to mark the spot on the inside of the bowl with a marking pen. Then you can measure it. You'll note that the float needle sits in a little brass piece pressed into the bowl. You change the float height by moving the brass piece up or down. This can be done by very gently heating the float body, and then you'll find you can move the brass piece. I've done this on a stove with an electrical element. I put the heat on its lowest setting, a pot on the burner, and the bowl in the pot. An oven mitt is useful for holding the bowl. Bob Cram The correct float level is set by the design of the carburettor rather than the engine ... unless of course there is something about the mounting on a specific bike that dictates an alteration. For instance, if the carb is mounted at a severe downdraft (like a Goldstar), then the level will need to be reduced to prevent flooding. No such problem with our beloved Inters, though. I'd be cautious with adjusting the fuel level by moving the brass seat. It is designed to take its seating against a machined register, and there is a good chance that heat a vibration will cause it to move back to its original location over time. I've found that incorrect fuel level is most often caused by an old float whose tang has fatigued. Replacement is the only sure answer. Hope this helps,
Bob Cram I was cautioning against simply moving the seat away from its register
in 1. replace the float with a new one having a tang that had not
fatigued, or As you have suggested, it is prudent to heat the float chamber first. ... gREgg Converting Amal Concentric the Interceptor Has anyone
converted the original Amal Concentric carbs on their Interceptor
to the Amal MkII? If so, did they use the listed jetting for the
standard Interceptor or did Rick I think Dave Hollyman, Cardiff, UK could help you. Follow Royals link to his site. You'll find his email address there... Best regards Rick, The problem is that the pipe that extends into the float chamber may not quite reach the gas. To cure this I warmed up the plastic floats and gently bent the mounting to effectively raise the fuel level in the chamber. This seems to have worked and I also try to make sure the carbs are slightly "downdraught" when mounting them on the rubbers. The carbs are great when running well but the pilot blocks easily. This is usually a tiny hole in the throat of the carb close to the manifold. A single strand from a Bowden cable will normally clear it so I carry one with me! Starting procedure is thus: Turn on choke lever(s). Turn over engine
twice. Dave Hollyman |